
What changed: the screenshots are now our own iPhone 17e on iOS 27.0.1, dark mode, and the wording is checked against those screens and Apple's iOS 27 guide.
howtosimply.com/guides/how-to-turn-off-lens-correction-on-an-iphone-camera/ · Checked October 2026 · iPhone 17e · iOS 27.0.1
In this guide
Open Settings, tap Camera, scroll down to Photo Capture and switch off Lens Correction. The iPhone then no longer adjusts photos taken with the front camera or the Ultra Wide camera. On our iPhone 17e, which has a single rear camera, the note under the switch names only the front camera. The setting is on by default.
3 of 3 steps with real screenshots · 3 official sources below
- Device
- iPhone
- Shown on
- iOS 27.0.1 (iPhone 17e)
- App
- Settings
- Path
- Settings › Camera
- Real screenshots
- 3 of 3 steps
- Checked
- October 2026
- Sources
- 3 official, linked below
Step by step
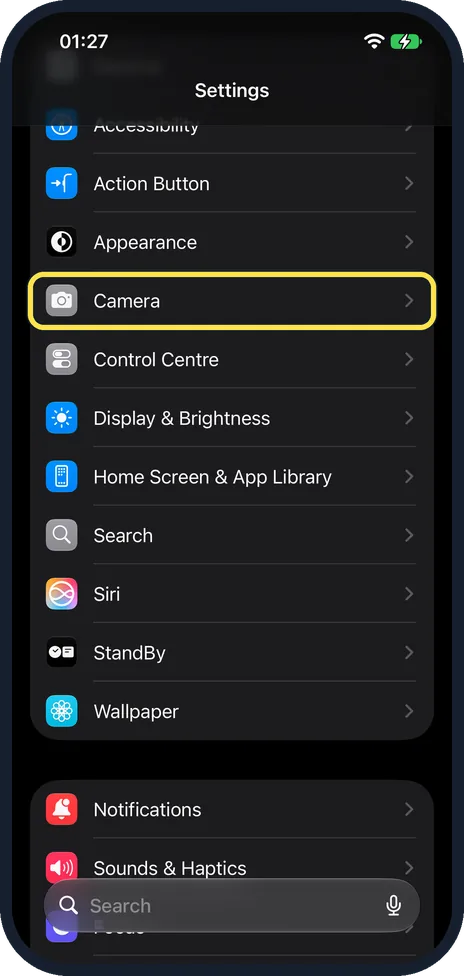
Open Settings and tap Camera
Tap Camera. It is in the group that starts with General, between Appearance and Control Centre.
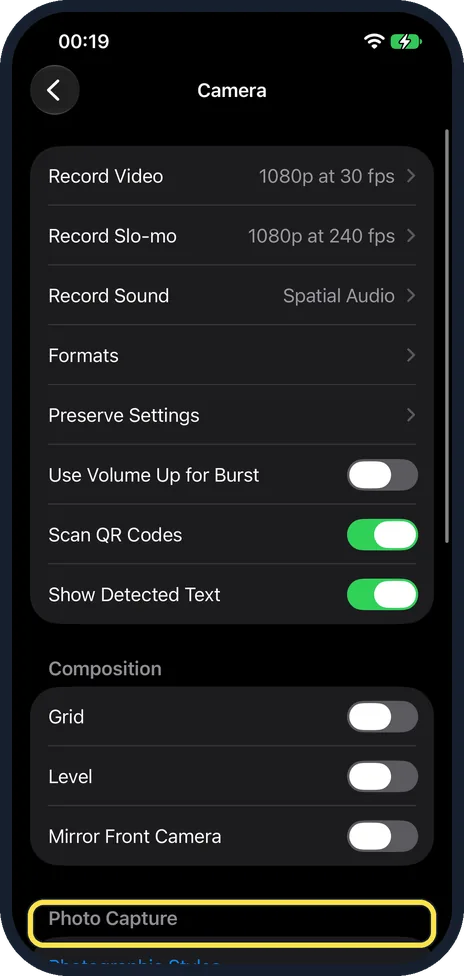
Scroll down to Photo Capture
On our iPhone 17e the Photo Capture heading comes straight after the Composition group, which ends with Mirror Front Camera. Lens Correction is a few rows further down, below Prioritise Faster Shooting.
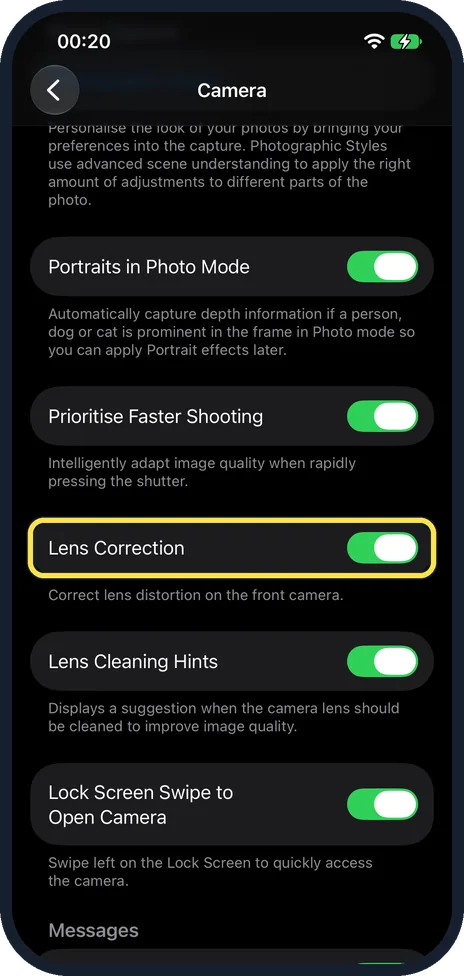
Switch off Lens Correction
On our iPhone 17e it was on. The note below reads: correct lens distortion on the front camera. On iPhones with an Ultra Wide camera, Apple says the setting covers that camera too.
What changed: the screenshots are now our own iPhone 17e on iOS 27.0.1, dark mode, and the wording is checked against those screens and Apple's iOS 27 guide.
If you do not see this option
- No Lens Correction switch Apple says the setting is on supported models. Its list runs from iPhone 12 mini to iPhone 18 Pro Max and includes the iPhone 16e, 17e and Air. On our iPhone 17e it is in the Photo Capture group, below Prioritise Faster Shooting. Source: Change advanced camera settings on iPhone · Source: Lens Correction models (iOS 27)
- The note names only the front camera Apple's iPhone 17e page shows a single rear camera, and on our iPhone 17e the note under the switch reads: correct lens distortion on the front camera. Source: iPhone 17e
If this does not work
- Lens Cleaning Hints switched off by mistake The two rows sit next to each other on our iPhone 17e. Switch Lens Cleaning Hints back on; it is the row below Lens Correction. Its note says it displays a suggestion when the camera lens should be cleaned. Source: Change advanced camera settings on iPhone
- No difference in photos from the rear camera Apple says Lens Correction adjusts photos taken with the front camera or the Ultra Wide camera. Apple's iPhone 17e page shows a single rear camera, and the note on our 17e names only the front camera. Source: Change advanced camera settings on iPhone · Source: iPhone 17e
About this guide
Lens Correction adjusts photos taken with the front camera or the Ultra Wide camera for more natural-looking results, in Apple's words. Our iPhone 17e has a single rear camera, and the note under its switch reads: correct lens distortion on the front camera. Apple offers the switch on supported models.
Screenshots: iPhone 17e, iOS 27.0.1, dark mode.
Good to know
To get the correction back, switch Lens Correction on again in the same place.
On supported models, what the preview shows around the frame is another setting on this page: how to turn off View Outside the Frame on an iPhone camera.
In short: Settings, Camera, Lens Correction off.
- Apple iPhone User Guide: Change advanced camera settings on iPhone
- Apple iPhone User Guide: iPhone 17e
- Apple iPhone User Guide: Lens Correction models (iOS 27)
Links checked in October 2026. Menus and features can change after software updates. These steps match the version named at the top.
Did this guide work for you?
Sorry about that. What happened?