
howtosimply.com/guides/how-to-tile-windows-side-by-side-on-a-mac/ · Checked October 2026 · MacBook Neo · macOS 27.0.1
In this guide
Hover over the green button at the top left of a window and pick a layout under Move & Resize or Fill & Arrange. Or drag the window to the left or right edge of the screen and let go. Apple says this needs macOS Sequoia or later.
4 of 4 steps with real screenshots · 1 official source below
- Device
- Mac
- Shown on
- macOS 27.0.1 (MacBook Neo)
- App
- System Settings
- Real screenshots
- 4 of 4 steps
- Checked
- October 2026
- Sources
- 1 official, linked below
Step by step
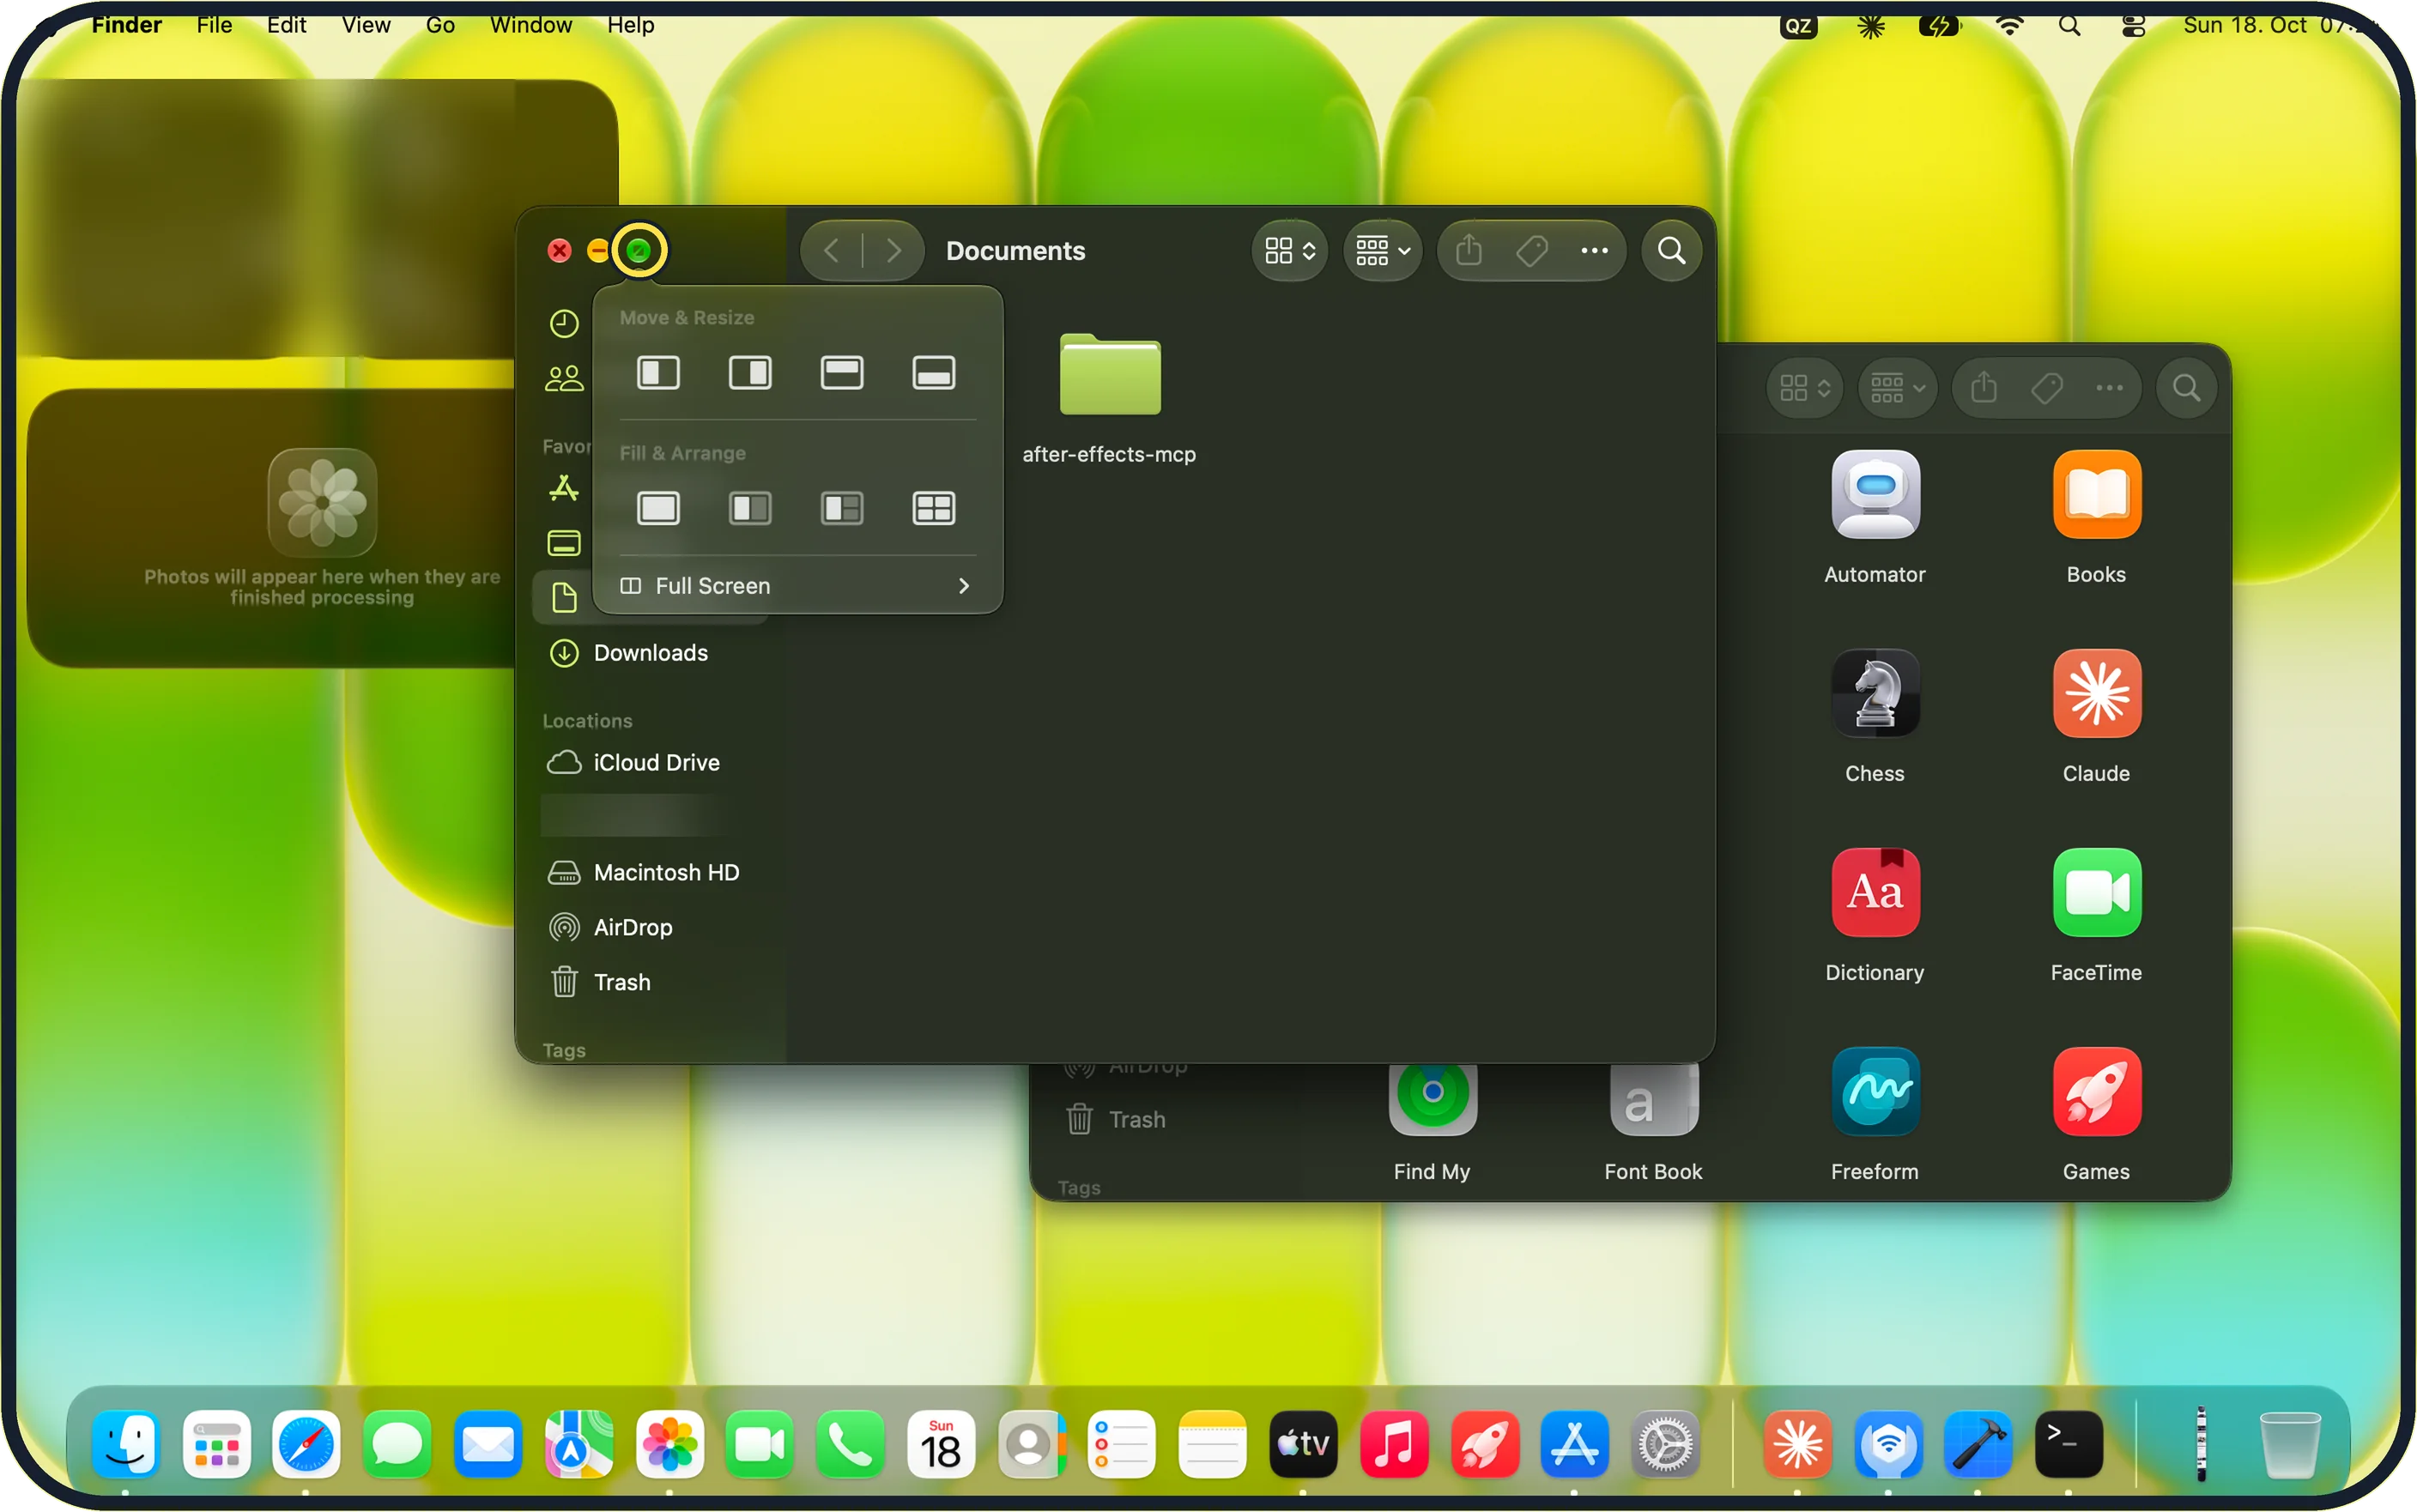
Zoomed in on the setting. Tap to see the whole screenTap the picture to see it full size Hover over the green button
Rest the pointer on the green button at the top left of the window, without clicking.
On our MacBook Neo a menu appears with Move & Resize, Fill & Arrange and Full Screen, which has an arrow to a submenu.
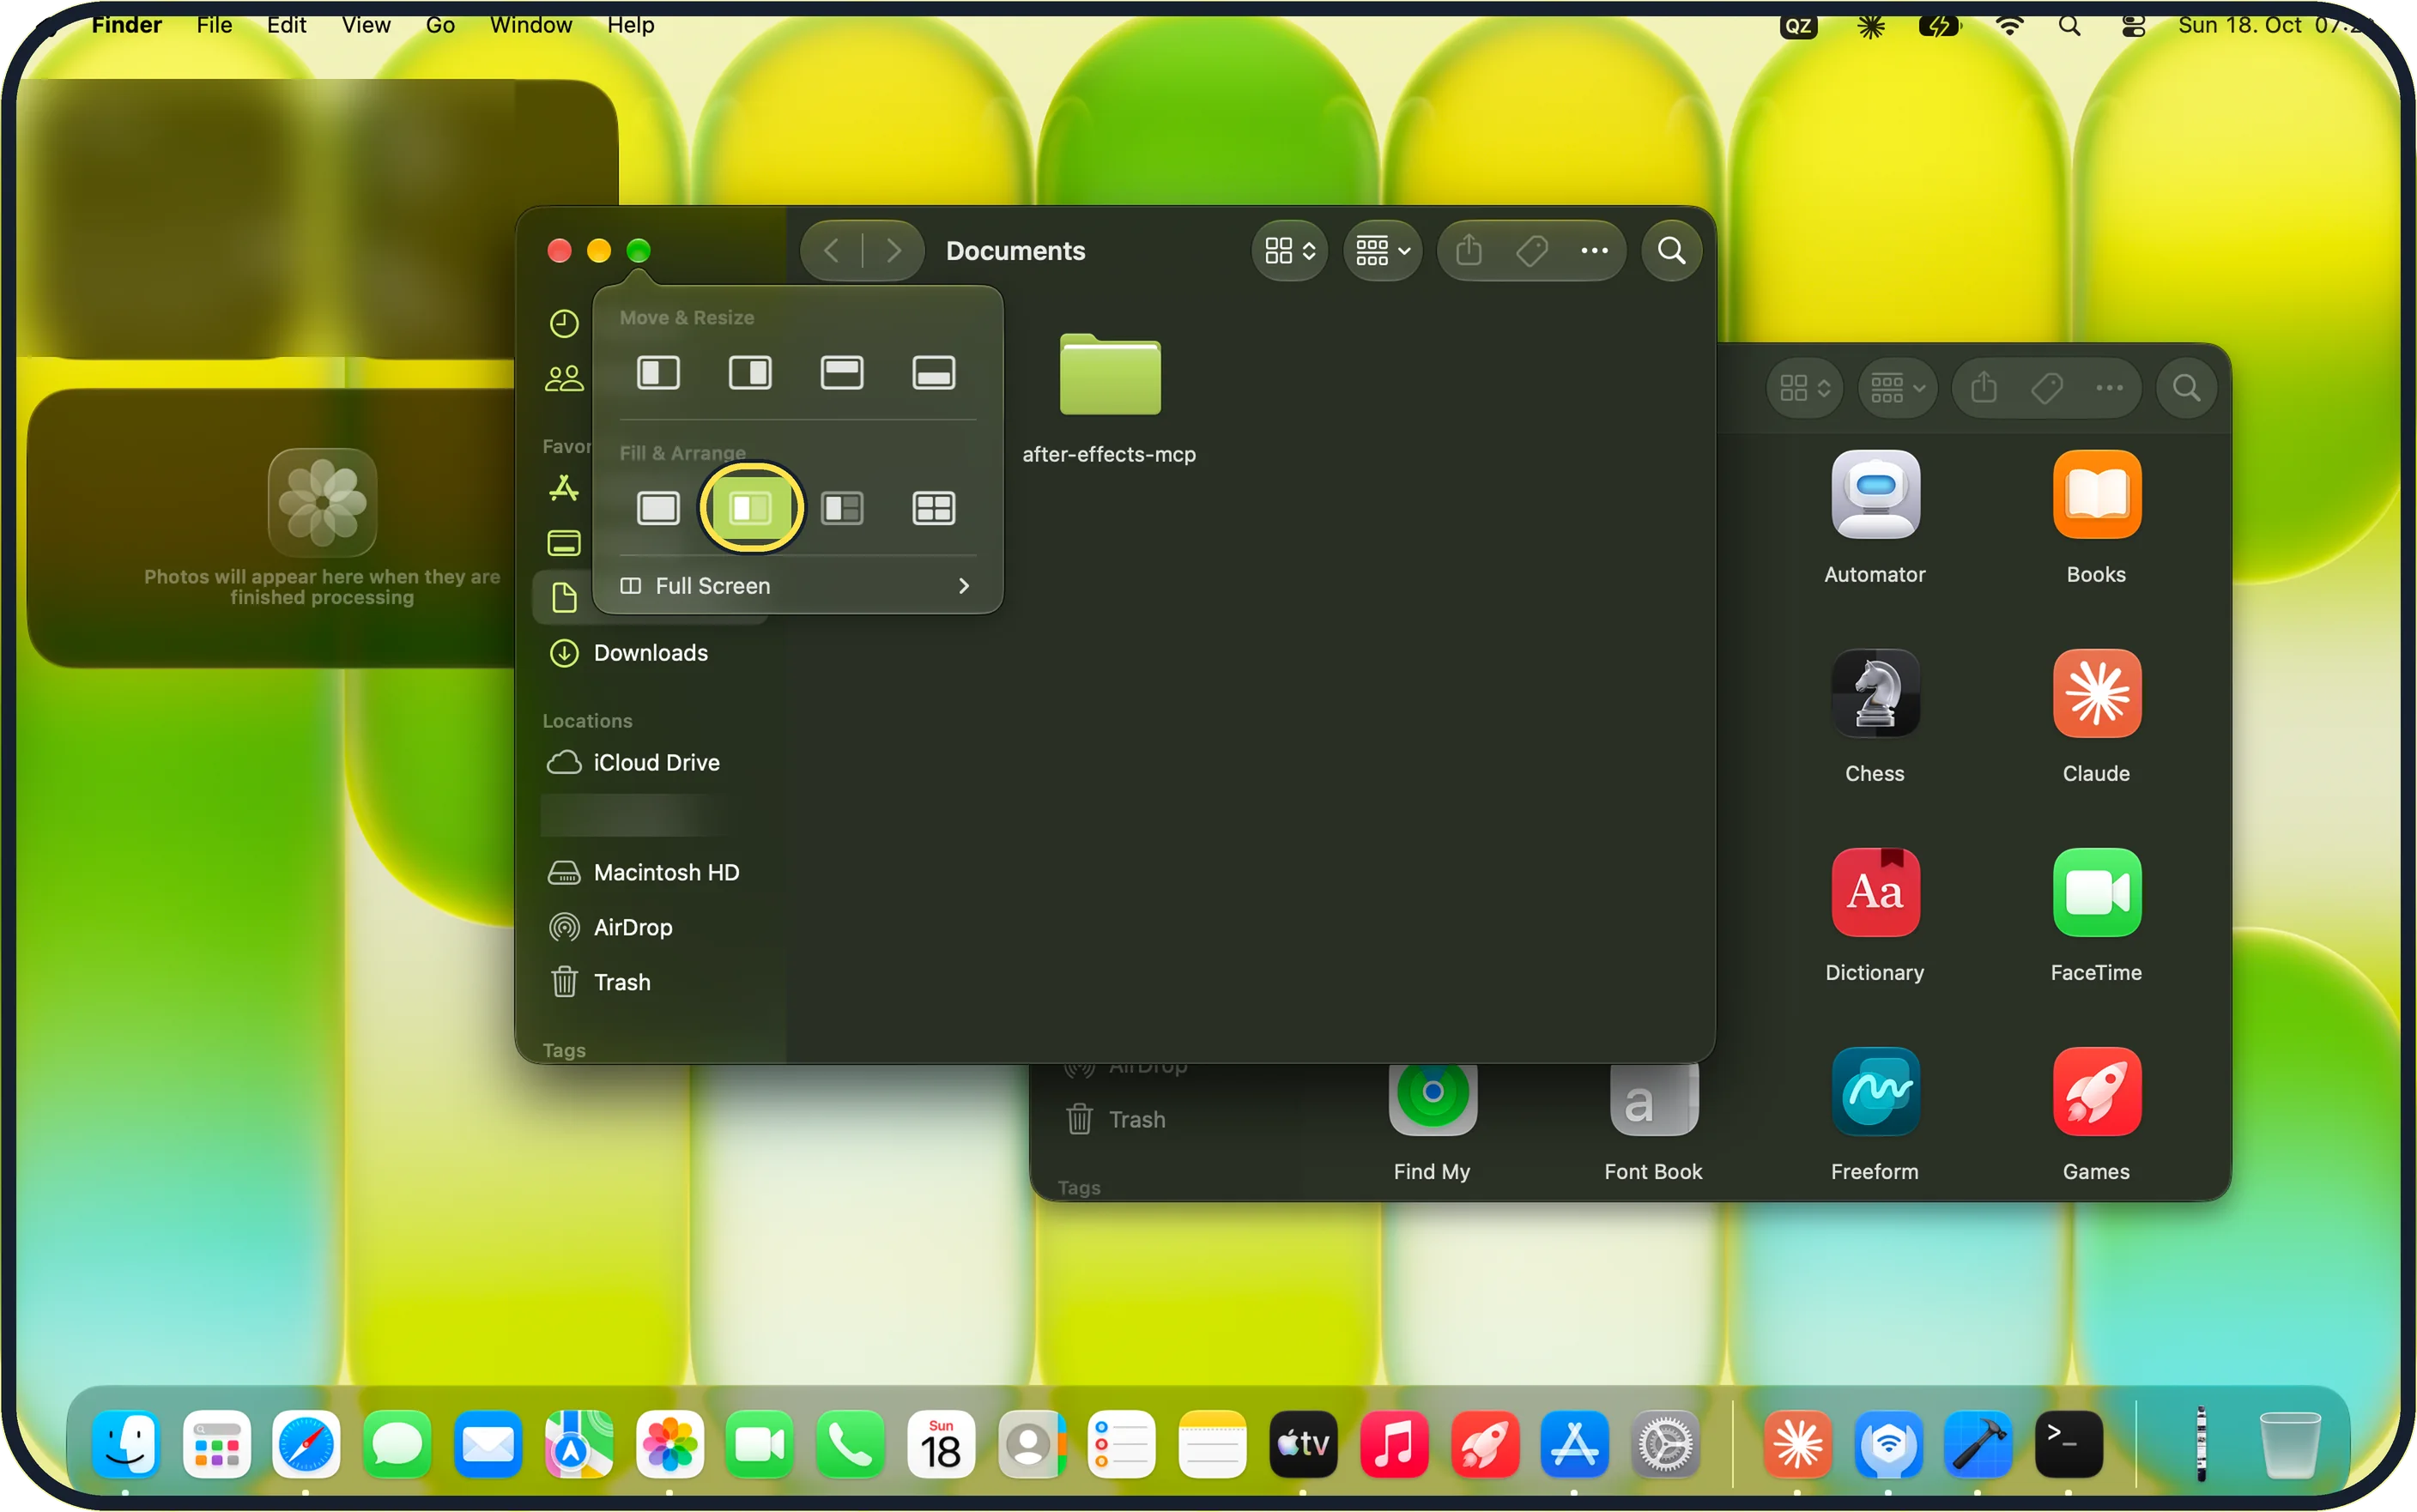
Zoomed in on the setting. Tap to see the whole screenTap the picture to see it full size Choose a layout
Under Move & Resize, click left half, right half, top half or bottom half. Under Fill & Arrange, choose fill, left & right, left & quarters or quarters to arrange several windows at once.
For two windows side by side, click the left & right layout.
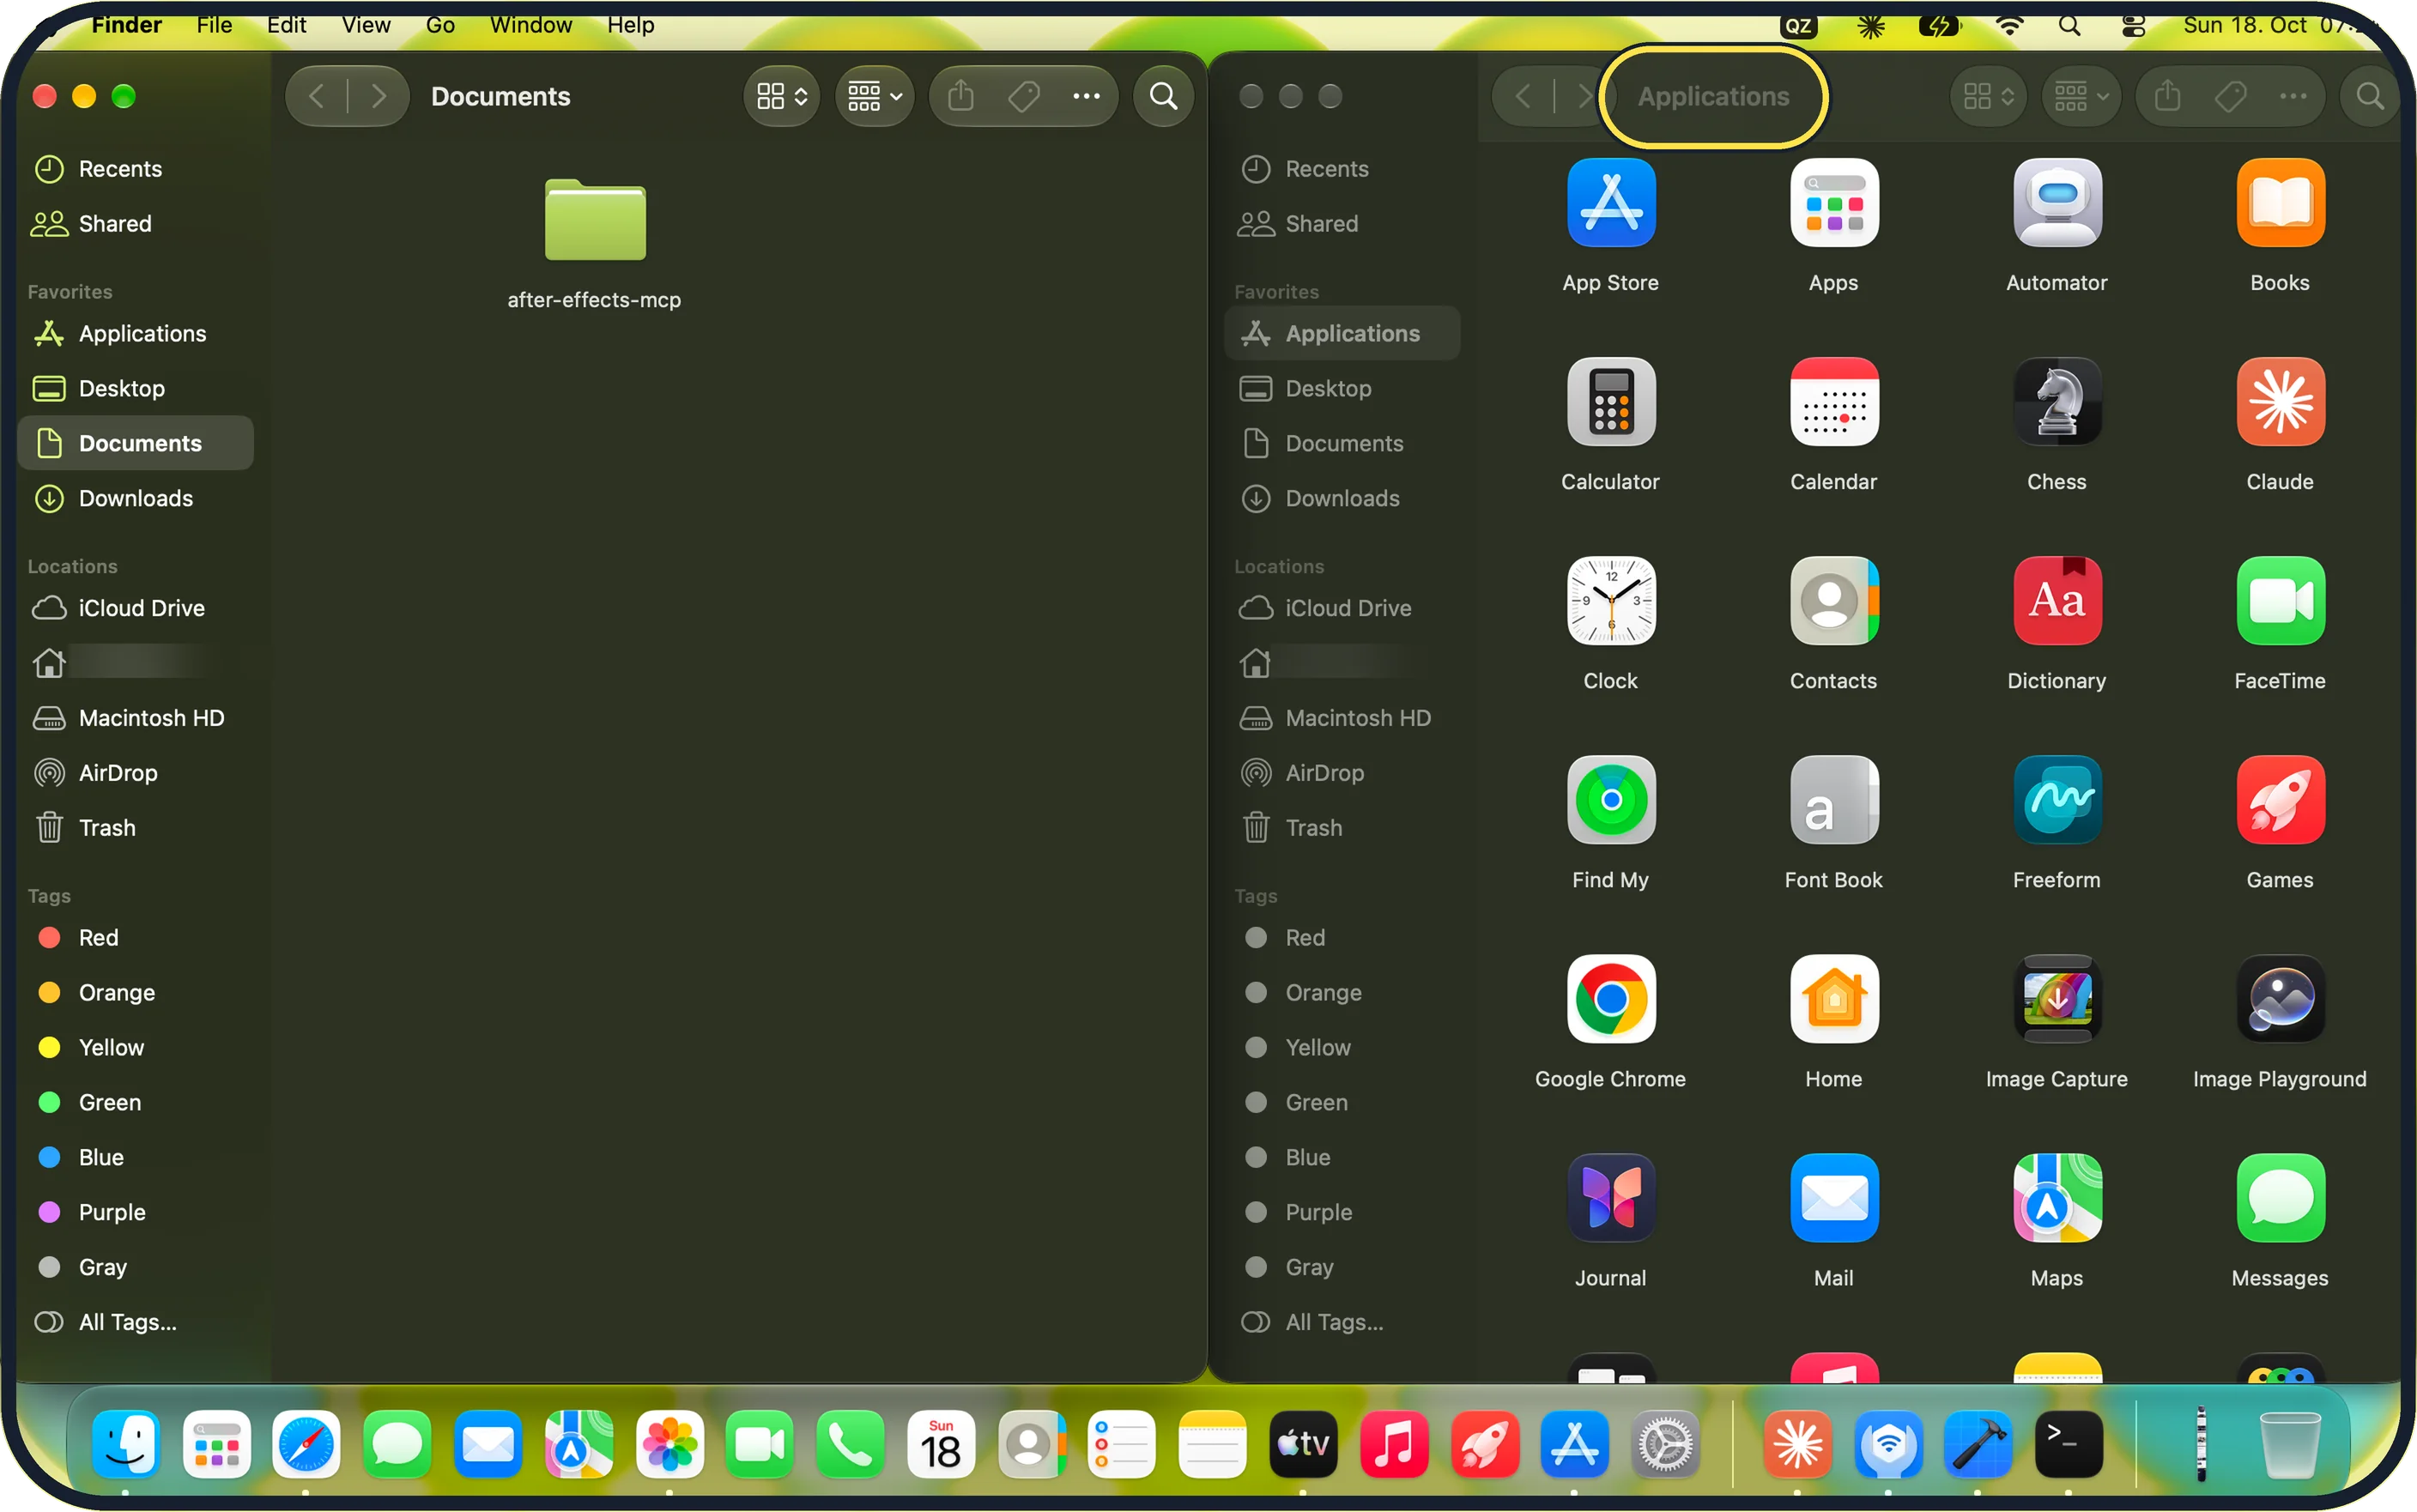
Zoomed in on the setting. Tap to see the whole screenTap the picture to see it full size Check the tiled windows
On our MacBook Neo, choosing left & right put the Documents window on the left and the other open Finder window, Applications, on the right, filling the screen.
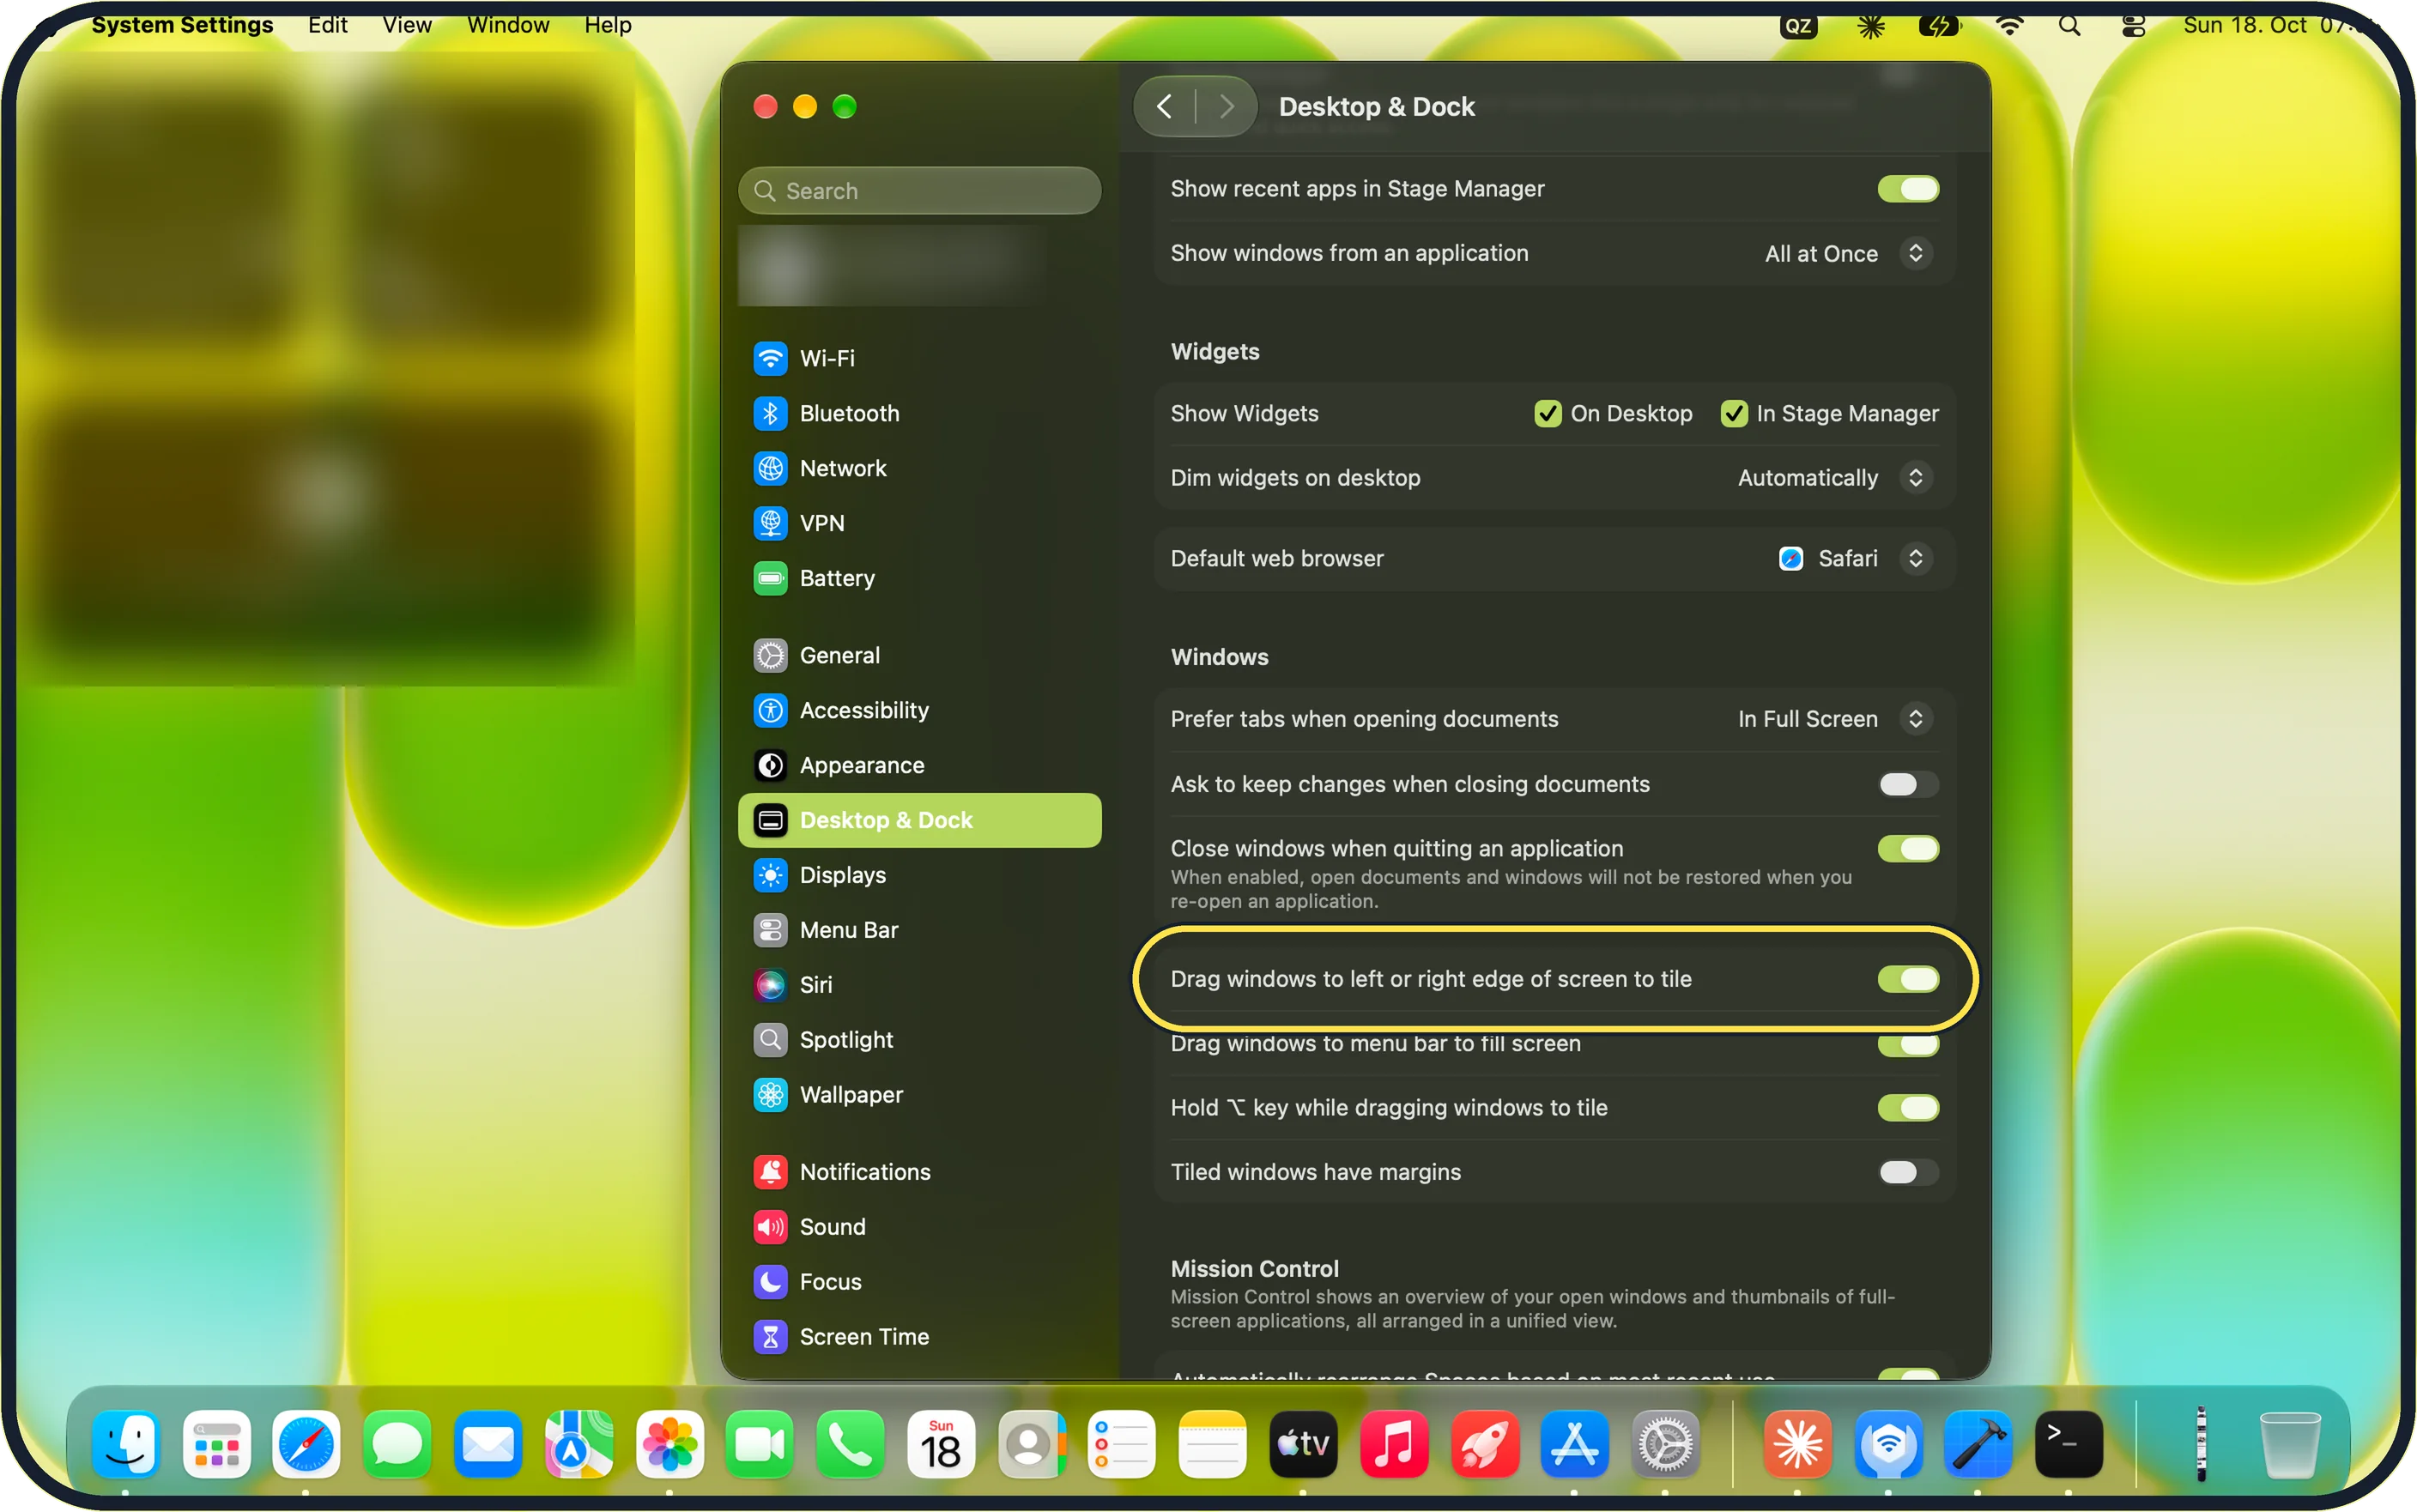
Zoomed in on the setting. Tap to see the whole screenTap the picture to see it full size Check the tiling settings
Open System Settings, click Desktop & Dock and scroll to Windows.
On our MacBook Neo, Drag windows to left or right edge of screen to tile, Drag windows to menu bar to fill screen and Hold ⌥ key while dragging windows to tile were on, and Tiled windows have margins was off.
What we saw on our device
- Hover over the green button: On our MacBook Neo a menu appears with Move & Resize, Fill & Arrange and Full Screen, which has an arrow to a submenu.
- Check the tiled windows: On our MacBook Neo, choosing left & right put the Documents window on the left and the other open Finder window, Applications, on the right, filling the screen.
- Check the tiling settings: On our MacBook Neo, Drag windows to left or right edge of screen to tile, Drag windows to menu bar to fill screen and Hold ⌥ key while dragging windows to tile were on, and Tiled windows have margins was off.
If you do not see this option
- No layouts when you hover Apple says the tiling menu needs macOS Sequoia or later. On older versions, hold the green button and choose Tile Window to Left of Screen. Source: Mac window tiling icons and keyboard shortcuts
- Full Screen options not listed In macOS 27 they sit in a submenu: move the pointer to Full Screen and its arrow to see them.
- Dragging to an edge does nothing Open System Settings, Desktop & Dock and make sure Drag windows to left or right edge of screen to tile is switched on under Windows.
If this does not work
- There is a gap between the windows Check Tiled windows have margins in Desktop & Dock. Turn it off to remove the gap; it was off on our MacBook Neo.
- Windows snap when you do not want them to Switch off the two Drag windows rows in Desktop & Dock. With Hold ⌥ key while dragging windows to tile on, you can still tile by holding Option as you drag.
- The keyboard shortcut does nothing Apple says you can use Window, Move & Resize in the menu bar instead, or hover over the green button and pick the layout. Source: Mac window tiling icons and keyboard shortcuts
About this guide
Tiling arranges windows so they fill the screen without overlapping, which helps when you compare two documents or copy between them.
Screenshots: MacBook Neo, macOS 27.0.1, dark mode.
Good to know
Another way: drag a window by its title bar to the left or right edge of the screen and let go. Apple says an outline shows where it will land, and dragging to the menu bar fills the screen.
Apple lists Globe + Control + Left Arrow or Right Arrow to send the active window to that half. To undo, drag the window away from the edge, or choose Window, Move & Resize, Return to Previous Size (Globe + Control + R).
To switch tiling by dragging on or off, open System Settings, Desktop & Dock and look under Windows for "Drag windows to left or right edge of screen to tile" and "Drag windows to menu bar to fill screen".
The small gap between tiled windows can be removed with "Tiled windows have margins" on the same page.
On older macOS versions, hold the green button and choose Tile Window to Left of Screen. That uses full-screen Split View.
In short: Hover over the green button > Move & Resize or Fill & Arrange > pick a layout (or drag the window to a screen edge).
Links checked in October 2026. Menus and features can change after software updates. These steps match the version named at the top.
Did this guide work for you?
Sorry about that. What happened?